Compress videos on Mac easily
Congratulations! Your search for “How to compress videos on Mac” has landed you in the perfect place. Here, we will be looking at the various ways in which you can compress your videos on a Mac for free without compromising in quality.
Video compression is an efficient way to save storage and also share files quickly. With advancements in technology, video files tend to become larger and larger in size as most of the content being recorded is now in UHD or higher. Hence, it is always a good practice to compress your video files whenever possible.
What is video compression?
Video compression is the process of reducing the total number of bits needed to represent a given image or video sequence. This reduction in the number of bits results in a reduction in the video size.
Compression of files has many benefits and people mostly do it for:
- Reducing the size of unnecessarily long files for faster sharing.
- Reducing the costs of storage hardware.
- Reducing communication bandwidth.
Here, we will be looking at some of the ways to compress video files on a Mac. We will be looking in detail at the various steps involved and will be walking you through different methods so that you can compress your videos easily. So let’s get started without further ado.
Compressing videos using an Online Compressor
You can easily compress a video without downloading any third-party applications on your Mac. The online video compressor by FreeConvert.com is enough to get the job done within a few clicks.
About: Video compressor by FreeConvert.com can be used to compress MP4, AVI, MKV, MOV or any other video file. Default advanced options reduce the video size to 60% of the original. Adjustments can be done to compress even more!
How to:
- Click here to open the online compressor.
-
Click on Choose Files to choose the video that you want to compress. Generally, videos in Mac are in MOV format since this is the video format used by Apple.

- By default, you can only upload files with a maximum size of 1GB. However, you can overcome this limit by upgrading to a paid version.
-
Once you have chosen your file, click on Compress Now! to carry on with the default settings and initiate the compression process.

-
Or, click on the Settings button(the little gear icon) to head on to advanced settings.
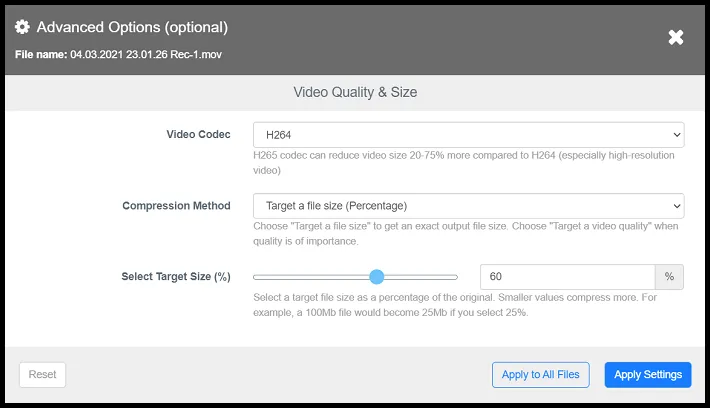
- Here, you can:
- Change the Video Codec: Video Codec is a technique of compression. You can either choose H264 or H265. H265 codec can reduce video size 20-75% more compared to H264 (especially high-resolution video).
- Change the Compression method: You can choose to compress either by percentage or select a target file size. Options for compressing by lowering video quality, video resolution and bitrate are also available though are not recommended.
- Change the target size: If you choose to compress by percentage, then selecting lower values of percentage will compress more. Smaller values compress more. For example, a 100Mb file would become 25Mb if you select 25%.
If you compress using file size, then just specifying the target file size will get the job done.
- Once you are done with the advanced settings, click on Compress Now! to start the compression.
- The time taken for compression will be proportional to the file size and the extent of compression chosen.
-
Once the compression is over, click on Download MOV to download
your file.

- You can also save it to your Google Drive or Dropbox by clicking on the down-arrow next to Download MOV.
Compressing videos using iMovie
You can easily choose to compress your videos using iMovie on Mac. iMovie comes pre-installed with most of the Macs but in case you don’t have it installed, you can download it from here.
About: iMovie is a video maker and editor for iOS and macOS, where you can enjoy your videos like never before. It’s easy to browse your clips and create Hollywood-style trailers and stunning 4K-resolution movies and edit them on the go.
How to:
- Open your video file in iMovie and edit it as usual. If there is nothing to edit, don’t worry as the compression will happen in the exporting process.
- Once you are satisfied with your editing, you should now export your video file.
-
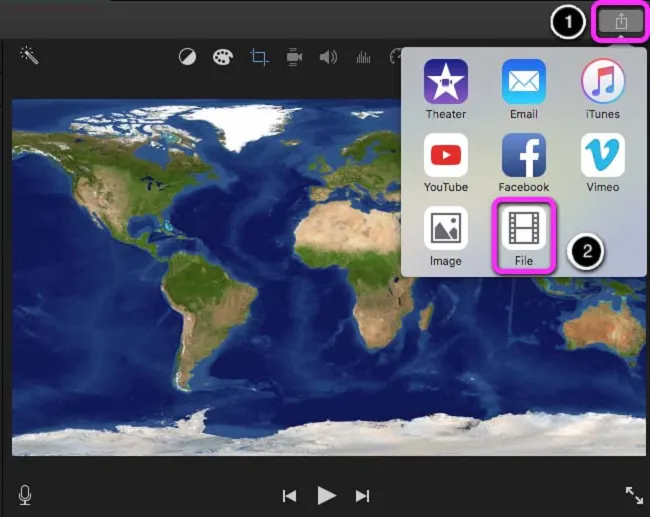
To export your video, click on the Share icon and choose File.
Picture Credits: Solent Online Learning
-
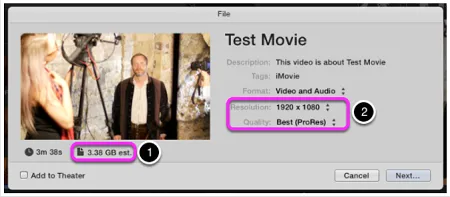
Upon choosing File, a new window will open which will resemble this:
Picture Credits: Solent Online Learning
- You can see that in this example, the video size is 3.38 GB, which is way too large. You can reduce this size by tweaking the Resolution and the Quality.
- You can see your new estimated file size as you tweak with the resolution and quality. Here, we have successfully compressed it from 3.38GB to 198 MB.
-
After you are satisfied with the resolution and quality of your video, hit Next….
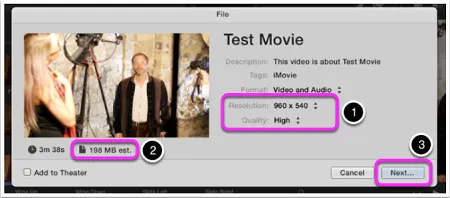
Picture Credits: Solent Online Learning
-
Give your newly compressed video an appropriate name and destination and hit Save.
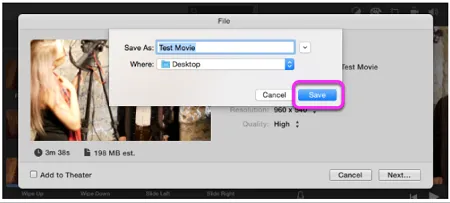
Picture Credits: Solent Online Learning
- Your video is now compressed and can be found in the location where you saved it.
Compressing videos using VLC Media Player
VLC Media Player is undoubtedly one of the most popular media players. Along with Mac, it is available for Windows and Linux as well. We can use VLC Media Player to compress our videos on Mac by changing the video format, framerate and other parameters.
About: VLC is a free and open-source cross-platform multimedia player and framework that plays most multimedia files as well as DVDs, Audio CDs, VCDs, and various streaming protocols. You can also convert your videos from one format to another. You can download VLC for macOS from here.
How to:
- Open the VLC media player on your Mac.
- After the VLC media player has launched, click on Media from the top toolbar.
- Choose Convert/Save from the drop-down menu.
- Click on Add and choose the video file that you want to compress.
- Click on the Convert/Save button to open the Convert Dialogue box.
-
From the drop-down menu next to Profile, select the required type of conversion. Although it is recommended to go for Video-H.265+MP3 (MP4) or Video-H.264+MP3 (MP4), you are free to experiment with other options.
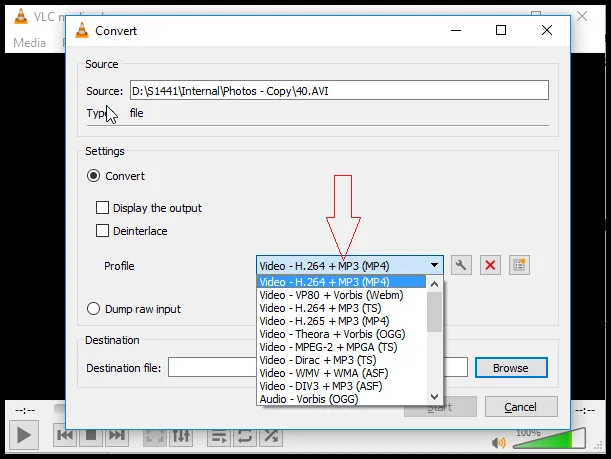
Picture Credit: Stellar
-
To compress your video even more by tweaking other video parameters, hit on the Edit selected profile icon next to the drop-down menu.
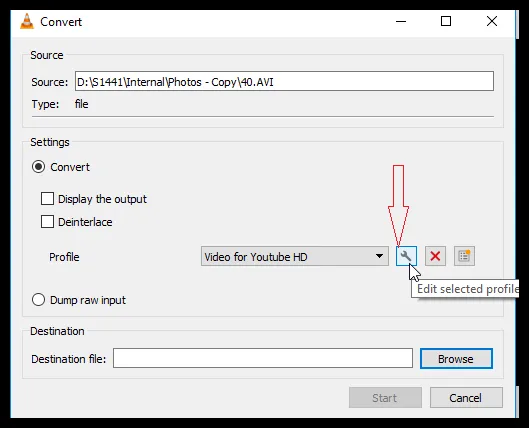
Picture Credit: Stellar
- Select the Video Codec tab and click on Encoding Parameters.
- Choose your codec(H.264 or H.265 is recommended) and change the bitrate if you would like.
- Make sure that the framerate is the same as the source.
-
Click on the Resolution tab to change your scale.
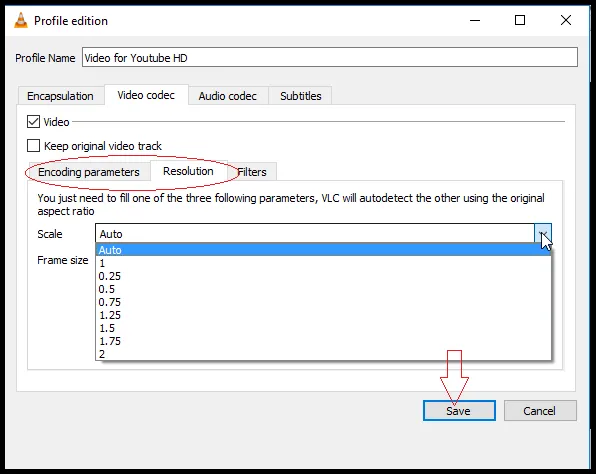
Picture Credit: Stellar
- Click on Save.
- Next, click on the Browse button and specify the file name and the destination where it will be saved.
- Finally, click on Start and your video will start compressing. You can find it at the destination you chose.
Compressing videos using HandBrake
HandBrake is one such offline software used for video compression. Since it works offline like the VLC media player, there is no need for a steady internet connection to get the job done.
About: HandBrake is a tool for converting and compressing video from nearly any format to a selection of modern and widely supported codecs. Since it is open-source, you do not need to worry about your privacy and can check up the code at any time. The cherry on the cake? It’s completely free on Mac along with on Windows and Linux. To download HandBrake on your Mac, click here.
How to:
- Open HandBrake on your Mac.
-
You should see an interface resembling this:
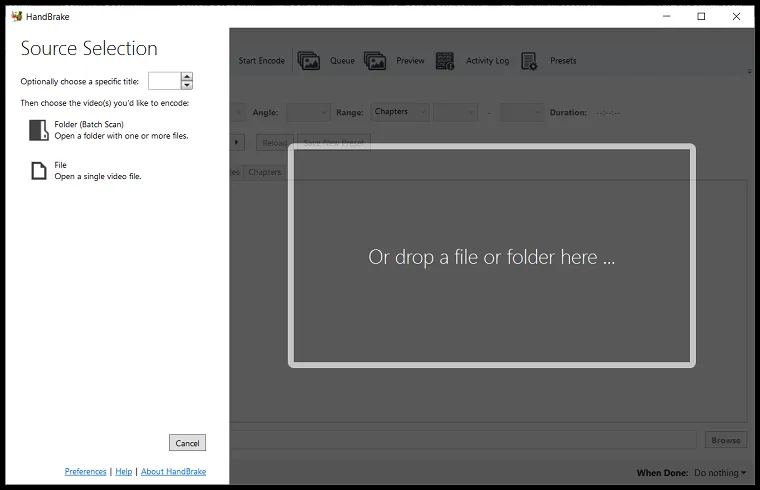
- Click on File to open a single video file that you want to compress.
- You can also drag and drop a file in the white rectangle to open it.
-
In the Summary tab, make sure that the format is MP4 and check on the web-optimized checkbox if not already checked.
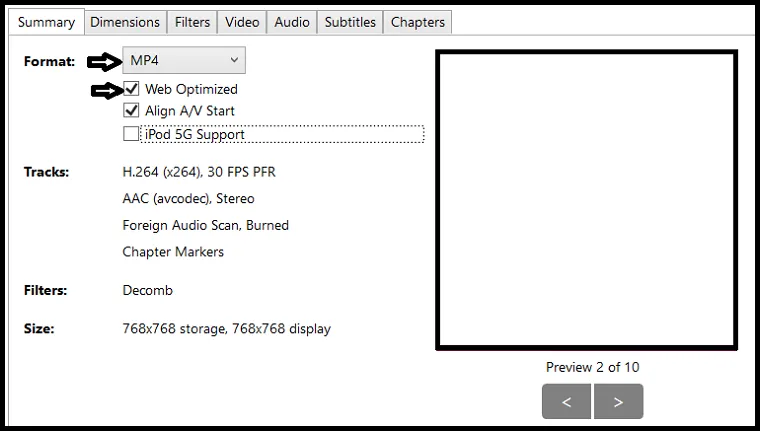
- Next, Go on the Video tab and make sure that the video codec is H.264 (x264).
-
Select “Same as source” in the drop-down menu next to Framerate (FPS).
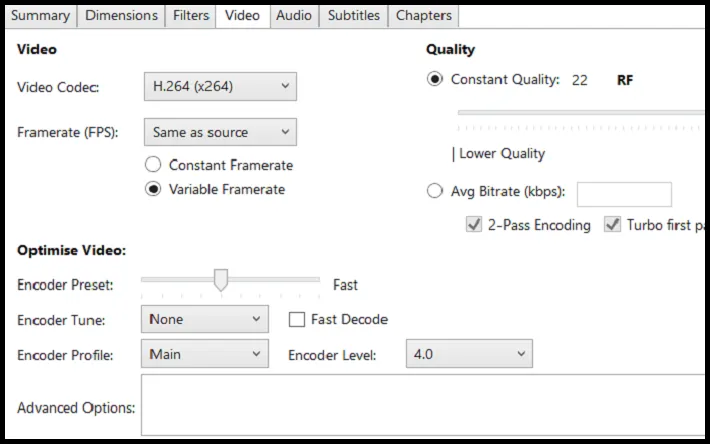
- You can also switch to Constant Framerate from Variable Framerate if you wish.
- A constant frame rate ensures a fixed framerate throughout the video. Whereas, a variable framerate will increase and decrease the framerate where it finds it necessary to do so.
-
Go on to the Audio tab and make sure that the codec is AAC(avcodec).

-
Finally, click on the Browse button in the bottom-right corner of the app to select a location where your optimized video will be saved.

-
Click on the Start Encode button present at the top to start the encoding process.

- You can find your compressed video file in the same location which you selected earlier for saving your video.
Compressing videos using Apple’s QuickTime Player
QuickTime Player is the default player on macOS developed by Apple. Although compressing videos on QuickTime Player is super easy and can be done in about five clicks, it does not provide many options or control over the compression and only compresses the video by lowering its resolution.
QuickTime Player is a video player by Apple that lets you make common movie edits like trim, rearrange, and rotate. You can also split a movie into multiple clips and manipulate each one individually. Although it comes pre-installed on most modern Macs, it can be downloaded for free from here.
How to:
- Open QuickTime Player on your Mac.
- Click on File and then select Open File.
- Choose the video file that you want to compress.
- Again click on File and this time hit Export As.
- Choose the required resolution from the list.
- The lower the resolution, the more is the compression.
- Choose a location to save the compressed video and select Save.
- You can find your compressed video in the location that you chose earlier.
Compressing videos using Shotcut
Shotcut is another open-source video editing software that lets you perform professional edits to your videos and compress them. Along with macOS, Shotcut is available on Windows and Linux as well.
About: Shotcut is a free, open-source, cross-platform video editor for Windows, Mac and Linux. Major features include support for a wide range of formats; no import required meaning native timeline editing; Blackmagic Design support for input and preview monitoring; and resolution support to 4k. You can download it on your Mac from here.
How to:
- Open Shotcut on your Mac.
-
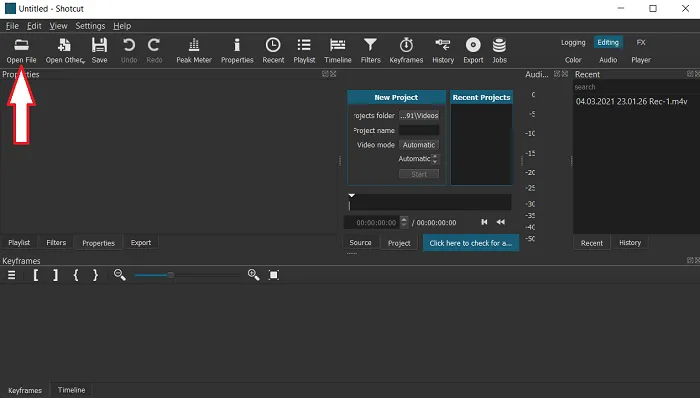
Click on Open File and choose the video that you want to compress.
-
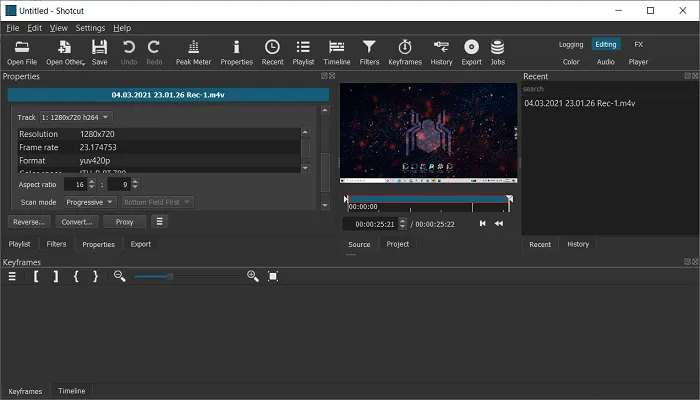
Once you have chosen your video, you can change its Aspect ratio or resolution to compress it.
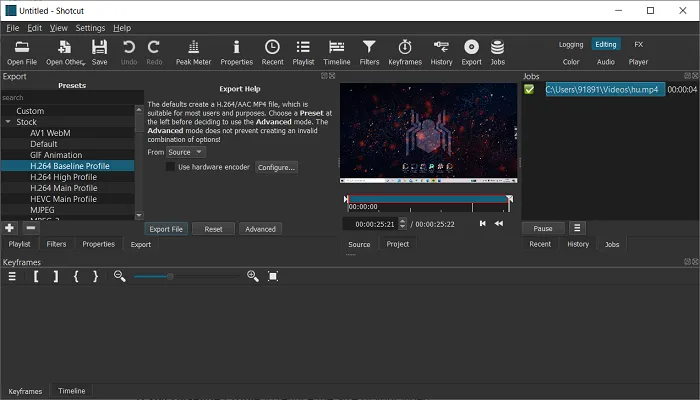
- Click on the Export button present near the top-right corner and choose H.264 Baseline Profile to reduce the size of your video.
- Click on Export File and choose a file name and destination.
-
Your video file will now start compressing, you can see the progress of your compression in the Jobs menu.
- Once it is completed, you can find your compressed video file in the same location that you chose earlier.
Compressing videos using Wondershare
Wondershare is a very user-friendly video compressor and converter for Mac. It is a perfect choice if you want to compress more than one video at the same time as it allows compressing many videos together with a single click.
About: Wondershare is an all in one video compressor and converter that lets you compress videos with the right size and quality for playback on mobile devices, sharing on social networks, sending emails, and other purposes. You can download it on your Mac from here.
How to:
- Open Wondershare UniConverter on your Mac.
-
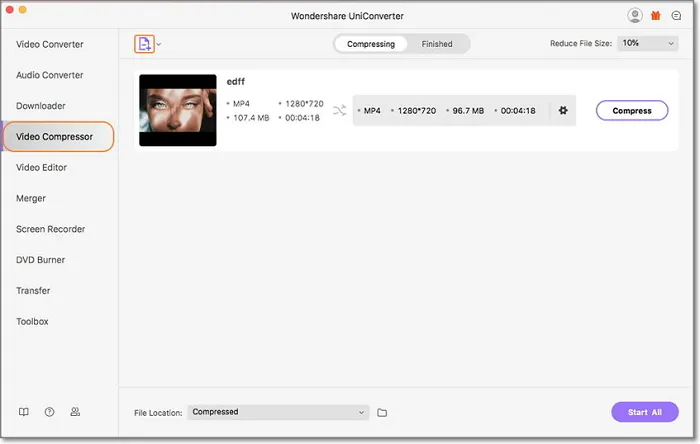
Click on the Video Compressor tab.
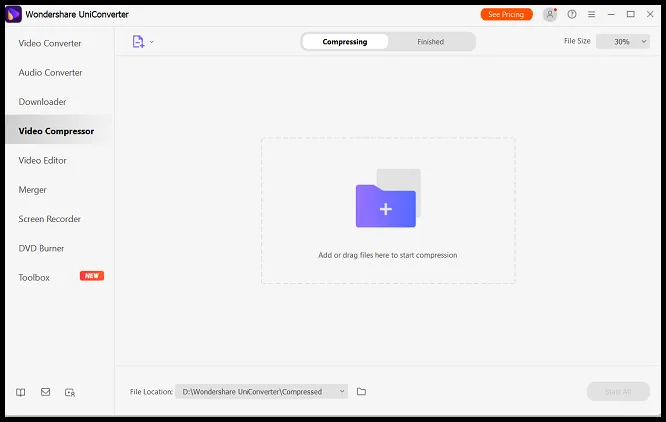
- Click on the file icon to add your video file or files. Alternatively, you can drag and drop them all at once.
- Once you have chosen your file, click on the drop-down menu next to Reduce File Size present at the top-right corner and select a suitable value. The more the value, the more is the compression.
-
You can see the estimated file size changing as you experiment with the values.
-
You can click on the gear icon next to your video file and adjust the resolution and file size too.
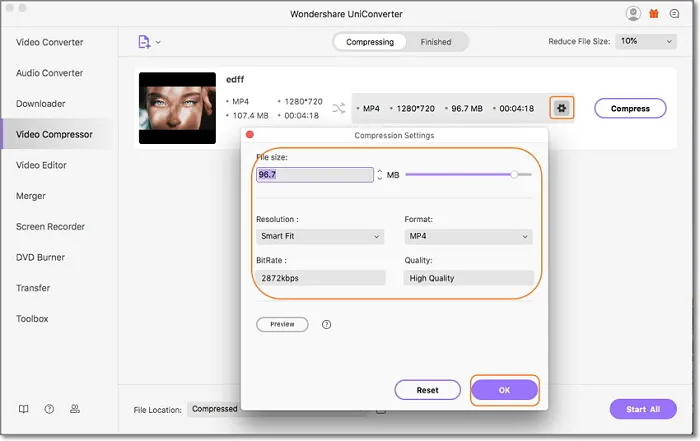
- Once you are done adjusting the parameters, hit Compress.
- Your video will now start compressing.
-
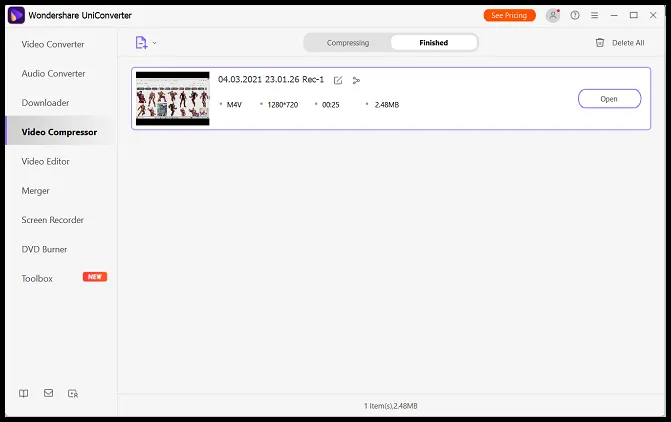
Once it is finished compressing, click on the Finished tab and click on Open to view your video.
So these were seven of the easiest ways to compress video files on Mac. Hope you try them out.


