How to easily embed video formats in PowerPoint
There is no denying that PowerPoint is the go-to tool for most of us for creating eye-catching presentations. Whether these presentations are created to target a general audience as in school or to establish a billion-dollar project idea at the workplace, PowerPoint covers both.
Although PowerPoint presentations are an excellent way to communicate information efficiently, slides after slides of texts can become a bit monotonous. Therefore, to keep your audience engaged, you must incorporate variety into your PowerPoint presentation. And this variety can be incorporated by adding attractive images and embedding various video formats in your presentation.
In this article, we will have a detailed look at the various types of video formats supported in PowerPoint and how you can directly embed them in your presentation without navigating away. So let’s get started without further ado.
Recommendations for audio and video format in PowerPoint
Before we begin embedding the videos, let’s look at the formats supported across different versions of PowerPoint so that our videos can be embedded without any hassles.
- PowerPoint 2010:
- Video recommendation: .wmv video files
- Audio recommendation: .wav, .wma audio files
- Newer versions of PowerPoint:
- Video recommendation: .mp4 files encoded with H.264 video and AAC audio
- Audio recommendation: .m4a files encoded with AAC audio
Now that we know that different versions of PowerPoint support different video formats, the method of embedding a video also differs a bit across two major versions, i.e., PowerPoint 2007 and PowerPoint 2010 and above.
Embedding video formats in PowerPoint 2010 and above
As already seen above, the recommended video format for PowerPoint 2010 is WMV whereas an MP4 works the best for PowerPoint 2013, 2016, 2019 and above. Therefore, in case you are embedding your video in PowerPoint 2010, it is recommended to convert it into a WMV.
Here’s how you can do it:
- Click here to open free video converter by CloudConvert.
-
Select MP4 to WMV.
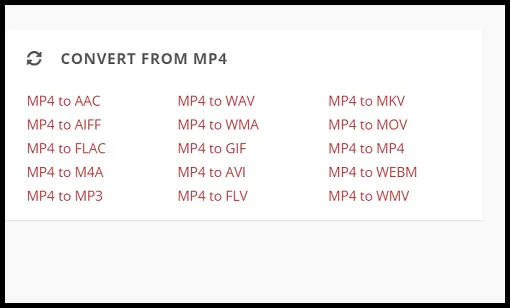
- Hit on Select File and choose the video file that you want to convert to WMV. It will even work if you choose some other video format instead of MP4.
-
Once it has been converted, click on the Download button to download your WMV file.

-
Similarly, you can also convert some other video format to an MP4 by choosing from the various options.
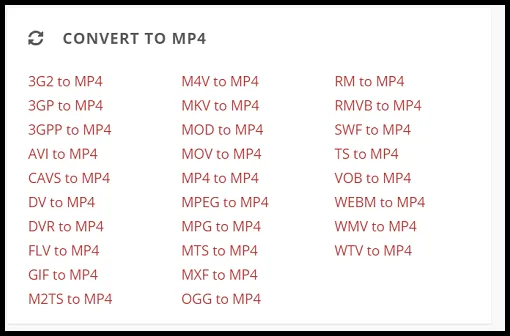
Once you have the appropriate video format according to your PowePoint version, you are all set to embed it into your presentation.
How to:
- Select the slide you want to embed the video in.
-
From here, you can embed your video in two ways:
- Either you can just simply drag and drop the appropriate video file into your slide to embed it.
-
Or you can hit on Insert from the ribbon and then on Video to select the video file from your local machine. Drag and resize your video on the slide to position it appropriately.

-
In case you want to embed a video from an online streaming platform such as YouTube or Vimeo, you can do it by:
-
Going to the video you want to embed and copy its link.

-
- Go back to PowerPoint and select the slide where you want to embed the video.
- Hit on Insert from the ribbon and then on Video.
- Select Online Video.
- In the Online Video dialogue box, paste the URL of the video you copied.
- Click on Insert.
- Your video is now successfully embedded and can be played directly from the presentation.
Embedding video formats in PowerPoint 2007
If you are trying to embed videos in PowerPoint 2007, then things can look a bit different although the process is mostly the same.
PowerPoint 2007 supports a variety of video formats including MPEG 4. However, it is recommended to go with MP4 formats. Here’s how to embed a video file in your PowerPoint 2007 presentation.
How to:
- Select the slide where you want to embed a video.
- Click on the Insert button from the ribbon.
-
Then click on Movie from the options.

Picture Credits: Chipchamp
-
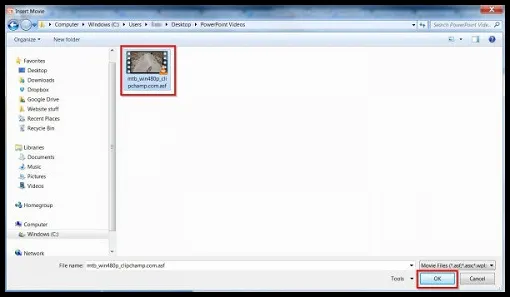
Choose a video file from your machine and hit OK.
Picture Credits: Chipchamp
- You have now successfully embedded a video to your PowerPoint 2007 presentation.
In case you want to embed a video from an online streaming platform such as YouTube into older versions of PowerPoint, you can do it by:
- Going to the video you want to embed.
- Get the embedded code for the video. For YouTube videos, this can be done by:
-
Clicking on Share and then selecting Embed from the options.

-
Click on COPY to copy the embedded code.
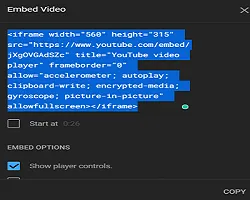
- Select the slide in your PowerPoint presentation where you want to embed the video in.
- Click on the Insert tab and then select Video.
-
Select Online Video from the drop-down menu that appears.
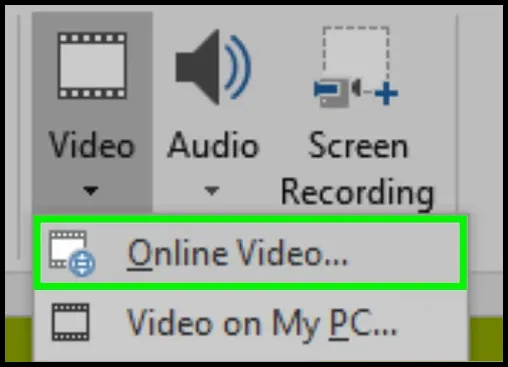
Picture Credits: WikiHow
-
Paste the embedded code that you copied and hit the Enter key on your keyboard.

Picture Credits: WikiHow
- Your online video should now be embedded in your presentation.
Embedding video formats in PowePoint by linking to a stored video on a PC
Embedding the videos by directly inserting them into your PowerPoint presentation comes with a downside. It balloons the size of your PPT considerably. Hence, an alternative to this is to link a video stored in your machine to a particular slide in your PPT.
Linking a video to your presentation can come with few complications. The most common one being a broken link. Therefore, to avoid such complications, it is advised that your PowerPoint presentation and the video that you want to link is present in the same directory. Here’s how you can embed a video by linking it.
How to:
- Select the slide where you want to embed your video.
- Click on the Insert tab and then, from the arrow under Video, select Video on my PC.
- A new dialogue box will open.
- In the Insert Video box, choose the video file that you want to link to.
-
Click on the down arrow next to the Insert button and then select Link to File.
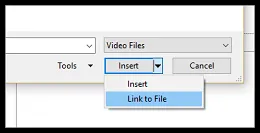
Picture Credits: Microsoft
- Your video shall now be linked to the selected slide of your presentation.
Playing the embedded video in the presentation
Now that you have successfully embedded a video in your PowerPoint presentation, it’s important that you also know of the various ways in which you can play this video.
By default, if the presentation is in Slide Show, the video will play as a part of the Click Sequence. This means that when you click anywhere on the slide to advance to the next step (or when you press the Spacebar, Right arrow key, or other keys that advances to the next step) the video will start playing.
The playing of the video in this manner is called In Click Sequence. However, you can choose to change this option by following these steps:
- Click on the embedded video in your PPT.
- You should see a Video Tools Playback tab on the ribbon.
-
Click on the list next to Start and choose any of the following options from the drop-down menu:
- In Click Sequence: This option is selected by default. When you click anywhere on the slide or press a key that triggers the next step (press the Spacebar, Right arrow key, or other keys that advances to the next step), the video plays.
- Automatically: The video will start playing automatically. If there are some animations to the slide, first the animations will be played and then the video.
-
When Clicked On: The video will only play when we click on the video.

Picture Credits: Microsoft
Troubleshooting of embedding video formats in PowerPoint
Sometimes it might happen that your video is not playing even after getting embedded or is not getting embedded at all. If you are embedding the video by linking it to the slide then the issue is likely because you have a broken link.
To avoid broken link, Microsoft advises having the presentation and the video to be linked stored in the same folder.
Other issues may arise because of incompatible or unrecognized video format or some incompatible encoding. A big video size may also cause problems and it is recommended to compress the video before embedding it.
Here, we will look at one such tool called HandBrake to optimize and compress your video so that it can be easily embedded in your PowerPoint presentation.
About: HandBrake is a tool for converting and compressing video from nearly any format to a selection of modern and widely supported codecs. Since it is open-source, you do not need to worry about your privacy and can check up the code at any time. The cherry on the cake? It’s completely free and can be downloaded on multiple platforms such as Windows, Mac and Linux.
How to:
- Head on to this site to download HandBrake for your system.
-
Once it is successfully downloaded and installed, you should see an interface resembling this when you open the app:
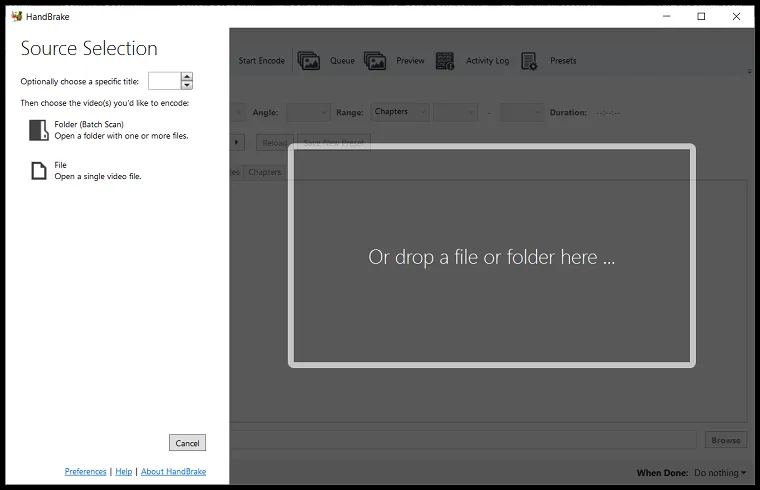
- Click on File to open a single video file that you want to compress.
- You can also drag and drop a file in the white rectangle to open it.
-
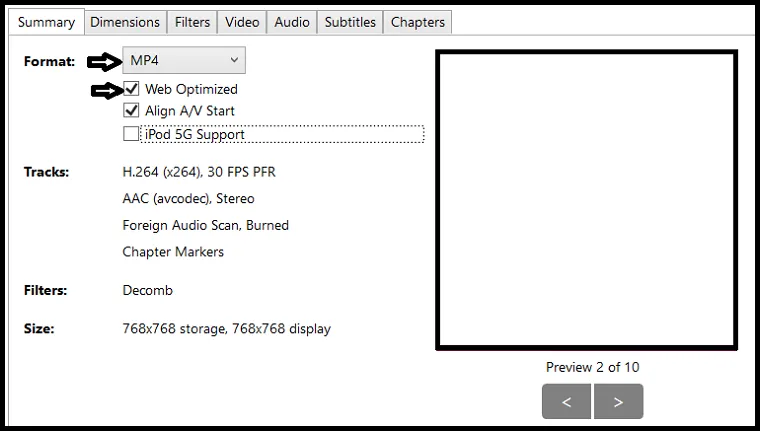
In the Summary tab, make sure that the format is MP4 and check on the web-optimized checkbox if not already checked.
- Next, Go on the Video tab and make sure that the video codec is H.264 (x264). Microsoft recommends H.264 codec for its videos.
-
Select “Same as source” in the drop-down menu next to Framerate (FPS).
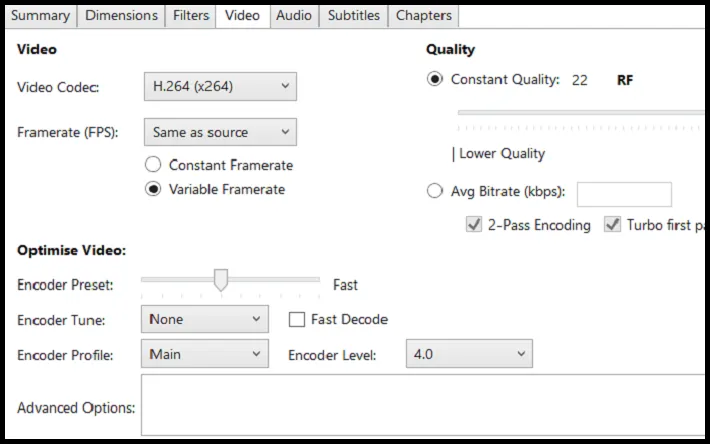
- You can also switch to Constant Framerate from Variable Framerate if you wish.
- A constant frame rate ensures a fixed framerate throughout the video. Whereas, a variable framerate will increase and decrease the framerate where it finds it necessary to do so.
-
Go on to the Audio tab and make sure that the codec is AAC(avcodec).

-
Finally, click on the Browse button in the bottom-right corner of the app to select a location where your optimized video will be saved.

-
Click on the Start Encode button present at the top to start the encoding process.

- You can find your compressed video file in the same location which you selected earlier for saving your video.
- This video can now safely be used for embedding it in your PPT.
In conclusion, these were the various ways of embedding a video in your PowerPoint presentation, playing the video and troubleshooting the issues. Hope you try them out.


