How to compress MOV files easily
With advancements in technology, compressing one’s files has become a common practice. And now, it is easier than ever. Compression of files has many benefits and people mostly do it for:
- Reducing the size of unnecessarily long files for faster sharing.
- Reducing the costs of storage hardware.
- Reducing communication bandwidth.
Here, we will be looking at some of the ways to compress MOV files. We will be looking in detail at the various steps involved and will be walking you through different methods comprising different operating systems so that you can compress your MOV file from any device. So let’s get started without further ado.
What are MOV files?
MOV is a file format used by Apple. It is a movie file saved in the QuickTime File Format (QTFF). MOV files use Apple’s proprietary compression algorithm and were introduced in the year 1988.
Compressing MOV files using an Online Compressor
You can easily compress a MOV file without downloading any third-party applications in your system. The online video compressor by FreeConvert.com is enough to get the job done within a few clicks and taps.
About: Video compressor by FreeConvert.com can be used to compress MP4, AVI, MKV, MOV or any other video file. Default advanced options reduce the video size to 60% of the original. Adjustments can be done to compress even more!
How to:
- Click here to open the online compressor.
-
Click on Choose Files to choose the MOV file that you want to compress.

- By default, you can only upload files with a maximum size of 1GB. However, you can overcome this limit by upgrading to a paid version.
-
Once you have chosen your file, click on Compress Now! to carry on with the default settings and initiate the compression process.

-
Or, click on the Settings button(the little gear icon) to head on to advanced settings.
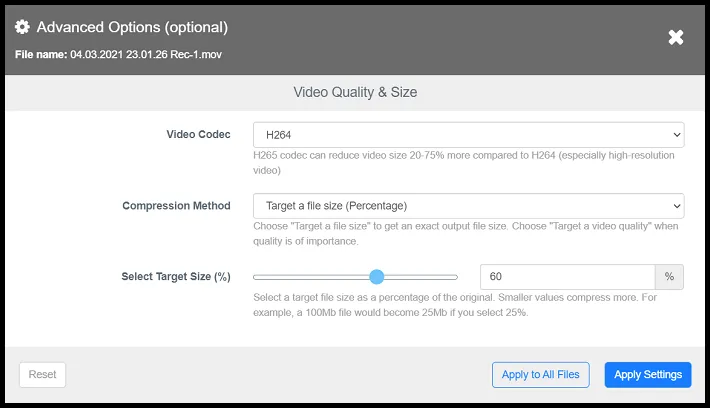
- Here, you can:
- Change the Video Codec: Video Codec is a technique of compression. You can either choose H264 or H265. H265 codec can reduce video size 20-75% more compared to H264 (especially high-resolution video).
- Change the Compression method: You can choose to compress either by percentage or select a target file size. Options for compressing by lowering video quality, video resolution and bitrate are also available though are not recommended.
- Change the target size: If you choose to compress by percentage, then selecting lower values of percentage will compress more. Smaller values compress more. For example, a 100Mb file would become 25Mb if you select 25%. If you compress using file size, then just specifying the target file size will get the job done.
- Once you are done with the advanced settings, click on Compress Now! to start the compression.
- The time taken for compression will be proportional to the file size and the extent of compression chosen.
-
Once the compression is over, click on Download MOV to download
your file.

- You can also save it to your Google Drive or Dropbox by clicking on the down-arrow next to Download MOV.
Compressing MOV files using an Offline Compressor
If you wish to compress your MOV files without any maximum file size limit or dependency on a steady internet connection, then downloading video compressing software is the perfect choice for you.
With no limits of file size and plenty of more advanced tools and features, video compressing software comes packed with powerful specifications that give you better control over the compression. Here, we will be looking at one such compression software called HandBrake.
About: HandBrake is a tool for converting and compressing video from nearly any format to a selection of modern and widely supported codecs. Since it is open-source, you do not need to worry about your privacy and can check up the code at any time. The cherry on the cake? It’s completely free and can be downloaded on multiple platforms such as Windows, Mac and Linux.
How to:
- Head on to this site to download HandBrake for your system.
-
Once it is successfully downloaded and installed, you should see an interface resembling this when you open the app:
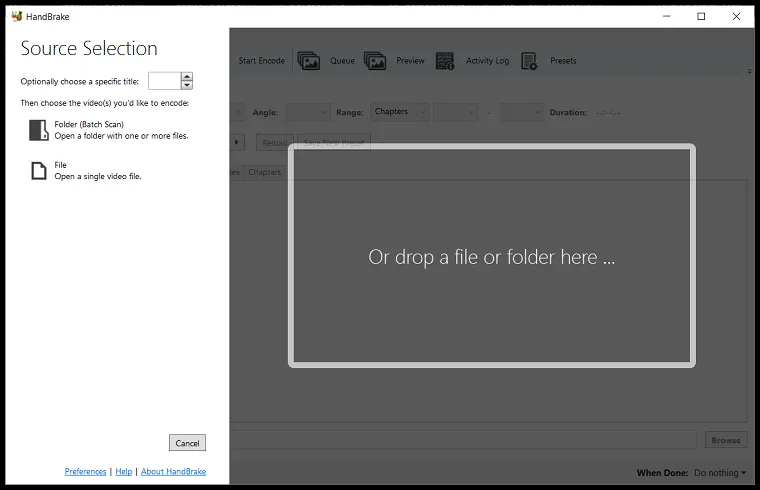
- Click on File to open a single video file that you want to compress.
- You can also drag and drop a file in the white rectangle to open it.
-
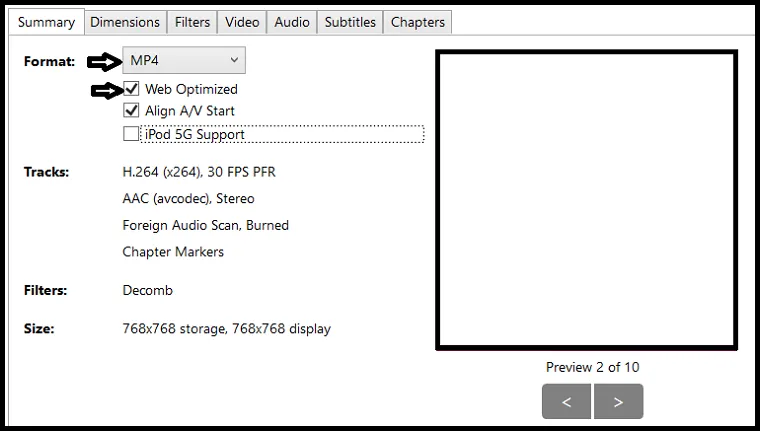
In the Summary tab, make sure that the format is MP4 and check on the web-optimized checkbox if not already checked.
- Next, Go on the Video tab and make sure that the video codec is H.264 (x264).
-
Select “Same as source” in the drop-down menu next to Framerate (FPS).
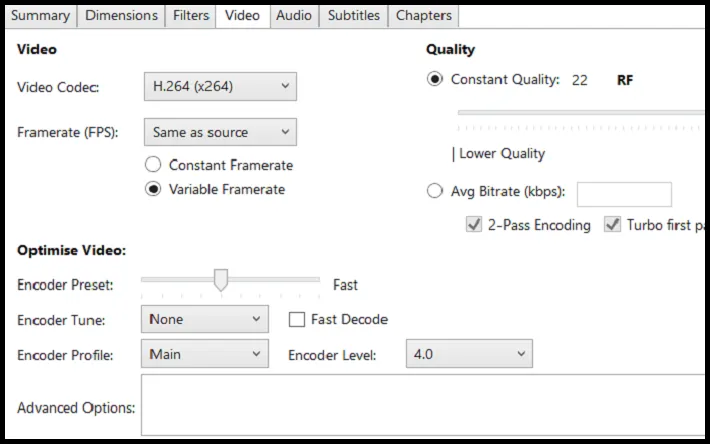
- You can also switch to Constant Framerate from Variable Framerate if you wish.
- A constant frame rate ensures a fixed framerate throughout the video. Whereas, a variable framerate will increase and decrease the framerate where it finds it necessary to do so.
-
Go on to the Audio tab and make sure that the codec is AAC(avcodec).

-
Finally, click on the Browse button in the bottom-right corner of the app to select a location where your optimized video will be saved.

-
Make sure to save the file name with an extension of .mov.
If you forget to do so, your MOV file will be converted to an M4V file.
-
Click on the Start Encode button present at the top to start the encoding process.

- You can find your compressed MOV file in the same location which you selected earlier for saving your video.
Compressing MOV files on iOS
If you want to compress the MOV files that you shot on your iPhone or iPad, then you can simply download a free app from the App Store and get your job done. Here, we will be looking at one such powerful app.
About: Video Compress - Shrink Vids efficiently shrinks the MOV files shot through your iPhone or iPad. This app allows you to customize the strength of compression (resolution and bitrate) and is very user-friendly and intuitive.
How to:
- Download the app by visiting this link.
-
Open the app and tap on the + icon to select the video that you want to compress.

- Although you can select multiple videos at once, it is recommended to select one video at a time.
- Tap on Done in the top-right corner.
- If you want to compress according to a preset, tap on Choose Preset and select the preset of your choice.
-
Or, you can drag the slider of Adjust bitrate to control the extent of compression of your MOV file.

- Dragging the slider to the left will increase compression and dragging to the right will decrease compression.
- Once you are done, tap on Continue.
- The video will now begin to compress. The time taken for compression will be proportional to the file size and the extent of compression that you chose.
- While the app is compressing your MOV file, it is advised not to lock your iPhone/iPad or close the app.
- Once it is done compressing, you can delete the original video (requires iOS 8 or later) or choose to keep it.
- Your compressed MOV file will appear in the Recents album of the Photos app on your iPhone/iPad.
So these were a few of the easiest ways to compress MOV files quickly and efficiently. Hope you give them a try.


